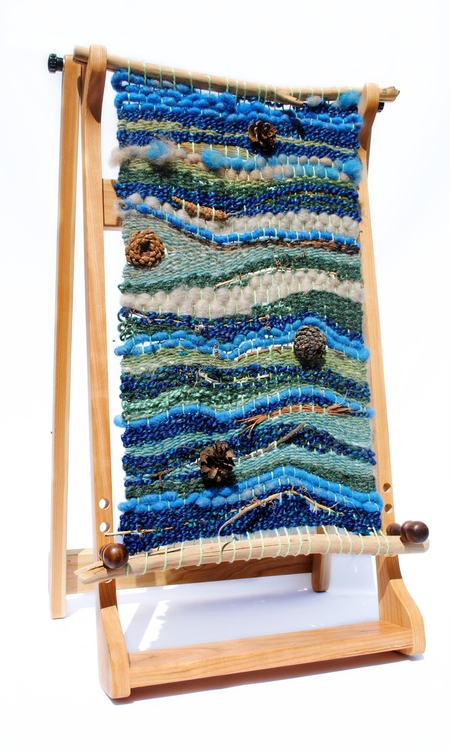
Branch Weaving
Organic Doodle Weaving
Weaving with Space
My favorite weaving technique that I discovered thru experimentation was leaving a wide gap in my loom. I threaded about 1 inch of warp on either edge. The results were very beautiful to me and I loved the way it allowed the textures of art yarns to "breathe".
Beginner Weaving Mistakes
I spent 4 weeks in December & January with my Ashford Sample-It Rigid Heddle Loom experimenting with a huge collection of yarns and scraps from my stash.
I wanted to learn, hands on: what warp threads to use, what different yarns do, what intentional "mistakes" are beneficial, what "mistakes" shouldn't be repeated, and teach myself as much as I could (my favorite way to learn) about the most basic guidelines of weaving with art yarn.
Here are some guidelines I decided to follow while weaving. These are probably rules in books, but in my world all art rules can be broken in some way to make something beautiful. However, based on my frustration learning "the hard way" - here is what I found:
Weaving Mistakes:
- When I used slippery (metallic gold) warp thread, my weaving fell apart. The knots untied after a day and it unraveled. Lesson learned. No slippery threads for me.
- When I used a stretchy warp thread (not even realizing that it had stretch) I wove a scarf and when I took it off the loom it was 50% the size that I planned. Impossible to wear. Awkward length. Lesson learned. I might try a length of stretch in the future (like elastic warp thread down the center of a scarf to create a very ruffly scarf) but as the entire warp - nope. Now I triple-check all my threads to make sure they aren't stretchy.
- Thick warp (like fabric) makes a scarf that many people might find too heavy / bulky. But the fringe on the ends is sure pretty. Anything with a bulky warp needs to be woven super, super loosely or it becomes rigid and uncomfortable to wear.
Weaving Highlights:
- Cotton warp thread is my favorite. By far. It isn't too stretchy, or heavy, or itchy, or grabby. It's got the goldilocks principle: it is just right.
- Leaving intentional big gaps in my warp was my favorite technique to play with. It allows the art yarn to breathe and be exposed like it is in the skein. And, as someone who is inspired by skeined yarn rather than patterns, this was a big deal to me.
- Using an accent yarn as a stripe in the warp (slightly off center) created a very pretty result.
- Making sure my blocks of color were random looked better than keeping each block the same size (too stripey for my taste)
- Putting fringe on anything was winning.
- Using any type of weft art yarn went effortlessly. There was never a moment thru my stash of random yarn where I said, "This yarn isn't working". Every yarn worked. Every yarn looked great. Weaving seems to be the best answer for mystery or abstract project yarns.
- Leaving all the ends untucked = fringe = winning.
Stuff I want to weave for THISyarn in the future:
- Wirecore yarns used as the center warp yarn. To create a sculptural / moldable scarf.
- Elastic yarn used as the center warp yarn to create a ruffly scarf.
- Weaving a whole scarf just as fringe texture.
I hope these simple guidelines help you as you begin your own weaving journey. Happy Weaving!
- Ashley Martineau
Journey into Art Weaving
I was preparing for an art show that would include one of my longest standing art mediums, acrylic paint on larger than life canvases. As I put together my show a month prior to the open date I noticed I was missing something more. I began searching Pinterest and Youtube about hanging string art with feathers which lead me down a rabbit hole to finding wall tapestries. I had experience with macrame in my childhood and decided it could be a cross between that and crocheting.
The journey was rough at first. I began diligently following a detailed youtube about weaving which taught me how to make my own loom. This loom was created from a stiff piece of cardboard and about 100 pins that I wound my warp thread around and around. I used a thick metal weaving needle to go across with the same small cotton yarn as the warp. This took me ages to say the least. I believe between creating the loom and working full time, it took me about three weeks to have a two foot by one foot section of completed weave.
This was exhausting. Them I met up with master yarn spinner and writer, Ashley Martineau, and found out how to loosen up and make weaving actually fun. I began using a small tapestry loom, by Stephen Willette, which was an absolute breeze compared to my cumbersome metal needle that inched along.
I was throwing short strands of whatever lovely colored wool I thought would look good together. I tied beads, feathers and shells into my weavings. It was going so fast and I fell in love. Soon I moved onto the larger loom, called insert name, that allowed me to see the whole picture at once and create what I call, an art weaving.
This is what ultimately made it into my art show, each wall tapestry going beautifully with each painting, inspiring each other.
These art weavings take a bit more thought and love than the quickly churned scarf-like wearable art pieces but are, in my opinion, a part of the fine art world. Especially with the hand-dyed wools, found objects and arrangement placed into each tapestry.
My journey may be from a fine arts background but it was still a blessing to have a seat with master yarn spinner who taught me the importance of good looms and quality yarns. The art pieces I created now hang as a new path in my art medium tool belt right next to my long life passion for painting. I hope to create even more beautiful art weavings like these in the future.
- Stephanie Merritt
Melissa Kness, Shepherdess
In the Spring 2017 issue of THISyarn - we will be showing you what we've been weaving over the past several months to inspire your creativity in this ancient art form. Art Yarn & Weaving are like chocolate & peanut butter. They just go together. Below is an article interview with Melissa Kness, who contributed Teeswater Locks to her friend Laura Spinner to spin into a fun tailspun style art yarn that was featured in many of our weavings. Stay Tuned for photos & articles starring Melissa's wooly locks! - Ashley Martineau
Growing up on a ranch in southern Oregon Mom and Dad had a large herd of sheep. As a toddler I helped nurse bummer lambs back to health by the warm fire. Mom tells me I often tried to share a bottle with the lambs.
I had the love for sheep early in life. One Thanksgiving my mother-in-law taught me to knit and this sparked an interest in wool sheep. I wanted a rare and unique herd of my own. I began my search and discovered Cormos with their fine wool. That year I attended the Black Sheep Festival in Eugene, Oregon. While walking through the sheep barn I found the most beautiful sheep I had ever seen. She was striking with long gorgeous locks and black eyes and nose. I learned that this lovely animal was a Teeswater, a UK native. They are a rare and unique breed that is being introduced to North America through artificial insemination, as it is prohibited to import sheep from across the pond. I learned there were very few Teeswaters in North America.
Roy and Myrtle Dow of Colorado had a fantastic herd and I begin collecting the beautiful animals one at a time from them. Soon I had a herd of six Teeswaters. Bow Peep, my very first ewe from the Dow’s produced Vulcan from my first A.I. He is a 96.8% Teeswater ram, which is rare here in the US. He is a blessing, being beautiful and friendly. He has been the cornerstone of my program as I continue expanding my herd with wonderful Teeswaters.
Introducing Teeswaters to the US has been challenging with periodic bans on importing semen due to health scares in the UK, which has limited introducing new genetics.
As we all know, sheep multiply at a rapid rate and I now have a herd of 25 Teeswaters. My sheep are very sweet and friendly. At feeding time they gather around for their pats on their heads. I also find this a good time to continually evaluate their conditioning by feeling their backs and noting if one is standing back from feed, or any other behavior that may catch my eye.
Learning to take care of their long wool needs has been a challenge. To produce a quality fleece, long wools need to be fed well with a good balance of minerals. Special attention is required their first year to get them to grow big and strong to produce that first hogget fleece that everyone covets. A fleece 12 plus inches takes a lot of time and energy. Every time the sheep are moved to a new pasture I watch for any changes and adjust the rations as necessary. I have read “The Natural Sheep Guide” by Pat Colby, as well as pick up tips from fellow shepherds with hands on experience
I learned that if they are kept washed up and groomed when the fleece is ready to be clipped it comes off so nice. Also, I have chosen to hand clip my girls the old fashion way. I find this helps me sort the best locks off as I clip. The ewes are kept on their feet and stand calmly as I shear, and I feel this helps with their overall disposition too.
There is a lot of love and work that goes into raising these animals for art yarn, doll hair and other crafts. I very much enjoy and love my sheep and I hope you will enjoy and love working with fiber they have produced.
Wicked Big Christmas Stocking by 222 Handspun
Sit down with some hot cocoa, a kitty, some “wicked big” handspun, and get ready to knit up something bright for the holidays.
This is a pretty easy pattern that will work well with any super bulky thick and thin yarn for a fun afternoon project - the bigger and brighter the better! I used two large skeins of matching corespun neon yarn with jingle bells, mini pom poms, tinsel, and X-mas baubles spun in. There’s a simple ribbed cuff at the top and the rest is straight knitting. I started with circular needles and switched to DPNs for the toe, but you could use whatever you prefer.
Materials:
2 Skeins Super Bulky Yarn (about 80-100 yards). Using 222 Handspun Neon Super Bulky Corespun Art Yarn.
US 15 (10.00mm) Circular Needles (I used Knitter's Pride Trendz US 15 Circular 24 Inch Knitting Needles) or Double Pointed Needles (I used Three Ravens Studio US 15 DPNs)
5 XL Stitch Markers
Tapestry Needle (Optional)
Gauge: 5 stitches / 4"
Abbreviations:
K knit
P purl
SL slip stitch
SSK slip, slip, knit
K2TOG knit 2 together
P2TOG purl 2 together
Using Long Tail cast on, cast on 20 stitches. Place stitch marker.
Ribbed Cuff:
Row 1: K 2, P 2 to end of row
Row 2-5: Repeat Row 1 (K 2, P 2) knitting in the round for about 5 (about 4 inches long).
Leg:
K 20. Continue knitting in the round until stocking is about 16 inches long.
Heel Flap:
Row 1: K 8 stitches. Place a marker on right needle and turn work.
Row 2: SL 1 as if to purl, P to the end (7 stitches), turn work.
Row 3: SL 1 as if to purl, K to the end, turn work.
Row 4: SL 1 as if to purl, P to the end, turn work.
Row 5: SL 1 as if to purl, K to the end, turn work.
Row 6: SL 1 as if to purl, P to the end, turn work.
Decreasing Heel Turn:
Row 7: SL 1 as if to purl, K 2, K2TOG, K1, turn work.
Row 8: SL 1 as if to purl, P2TOG, P1, turn work.
Row 9: SL 1 as if to purl, K2TOG, K2, turn work.
Row 10: SL 1 as if to purl, P2TOG, P2, turn work.
K2. Placing marker in middle of heel. K2.
Gusset:
Pick up stitches of heel side (3 stitches). Do this by placing needle through both legs of the V, wrapping, and pulling through onto needle. Add stitch marker.
Then continue to knit in the round towards back of heel marker (10 stitches).
Pick up heel gusset stitches in the V (3).
K 2 to back of heel marker.
Start mirror decreasing to original # of cast on stitches
K 2, K2TOG, K 14 to gusset marker, K 1 to marker at start of gusset, SSK
You can mirror decrease down again to 14 stitches starting 3 stitches from center heel marker.
K all around for 5 rows. Transfer to DPNs starting at center heel marker.
K2 , K2TOG, K 4, transfer to DPN, K 4, K 2
K 12 (all)
K 12 (all)
Decrease row 2 stitches in from heel marker
K 2, K2TOG, K2 SSK, K 2, K 2
K 12
Use Kitchener stitch to close toe stitches together.
Weave in ends with tapestry needle.
Attach pom poms or tassels to the toe and cuff. You can knit an icord from leftover yarn to use as a hanging loop.
Block if you like, or don’t if you can’t wait to show it off to all your friends.
Oh, and please make sure to not leave unattended with your furry creatures or offspring.
Enjoy!
© 2016 222 Handspun. All rights reserved.
Ahoy Cowl
Featured Knitting Stitch Pattern: Sailor Rib
This is a simple stitch pattern that adds a texture that is deeper than simple ribbing. It is easy and adds amazing depth to your finished piece; plus it’s reversible. Try it with some handspun and make a scarf or cowl. It’s a great unisex stitch pattern, and so many yarns look amazing in this stitch!
Sailor Rib (multiple of 4 + 3 stitches) - see "Mistake Rib Stitch" video below.
- Row 1: *P2, K2; repeat from * until 3 stitches remain; P2, K1
- Row 2: *K2, P2; repeat from * until 3 stitches remain; K2, P1
AHOY COWL
Natural burly-spun Icelandic wool handspun gives this cowl a rugged, squishy look knit in Sailor Rib pattern, while the other half is knit with a thick and thin soft alpaca blend yarn that lightens the look of the cowl.
MATERIALS:
- Approximately 70 yds of a thick and thin Icelandic/gotland lock yarn, or any thickly spun lock yarn, to get a similar look
- Approximately 75 yds of Asana Bulky (50%wool / 50% alpaca, 140 yds), color 406, by Galler Yarns, held double. (chunky yarn, recommended to be knit with a size 10-10.5 needle)
- Length of Sari Silk ribbon (optional, for seaming)
- Size 13 needles, straight or circular*. Cowl is knit flat then seamed.
- Yarn needle for seaming.
*Swatch! Choose the size needle that makes a fabric YOU like. Sailor rib looks more dramatic knit at a denser gauge.
PATTERN:
Cast on 15 stitches (or whatever width you’d like your cowl to be)
Follow Sailor rib pattern for 7-10 inches, or however long you’d like your cowl to be made of handspun yarn (i.e. half length- sample is long enough to wear as a simple cowl)
When the cowl is about half as long as you would like, switch yarn to the Asana Bulky (held double). Change stitch pattern or continue in Sailor Rib.
Continue knitting until the cowl is as long as you desire. Cut loose & get creative! Make it a long scarf or cowl, to wrap around your neck several times. Add another yarn or stitch pattern to the piece; the possibilities are endless! This could be a great use of small bits of handspun or a stash buster.
Bind off. Seam ends together with a yarn needle and a length of sari silk yarn for a dramatic seam, or to be subtle, seam with the Asana Bulky.
Block with Unicorn Fibre Rinse. Gently pat dry, reshape and dry flat.
7x7 Mitts
Featured Crochet Stitch: Half Double Crochet Through The Back Loop
Half double crochet (hdc) through the back loop (tbl) is such a versatile stitch! It adds a ribbed look (almost a knitted look) to your piece, and is also reversible.
My favorite project to do with this stitch is quick fingerless mitts. They can be done with several different sizes of yarn, and only takes about 60 yds. It is super quick- make a pair of mitts in an hour!
7 x 7 mitts
I like to make fingerless gloves for myself and as gifts. It takes less yarn than you think, perfect for a skein of handspun that is 70 yards or less. For longer mitts, look for at least 100 yards (crochet can eat up your yardage). The name comes from the dimensions- 7 inches long, and 7 inches wide, which is a nice basic length and width for most hands. The mitts are crocheted length wise, then seamed on one side leaving room for a thumb opening. In this stitch pattern, the mitts are substantial and ribbed, making them extra warm. For a more delicate mitt, use a smaller yarn and hook.
MATERIALS:
- 60 yds of handspun yarn - I used a bulky single ply, mixed wools and silk, plus approximately 20 yds of spiral ply handspun with loops and puffs (I ran out of the bulky single and added in a bit of coordinating funky plied yarn for one mitt)
- Size P crochet hook (or whatever hook gives you a fabric you like). Try not to be really loose as these will stretch with wear.
- Smooth worsted weight yarn or length of sari silk ribbon to seam mitts
- Yarn needle for seaming
PATTERN: (Make 2)
Crochet a chain that is 7 inches long (or however long you’d like your mitts to be). Make the chain rather loose for ease in crocheting the first row.
Chain 2 (turning chain; does not count as stitch). HDC tbl across the row.
Repeat the pattern until the mitt is 7 inches long (check to see if mitt fits around your hand- if not add another row or two). Bind off.
Seam the mitt using an invisible stitch (mattress or crochet together), or make it fun with a sari silk seam. Remember to leave about an inch open for your thumb.
Block with Unicorn Fibre Rinse. Gently pat dry, reshape and dry flat.
Bulk Up Your Stash
If your stash yarns are lightweight (fingering / DK / worsted weight), you can transform them into bulky yarns easily!
- Doubling: Hold two strands of yarn together (try two different yarns)
- Tripling: Hold three strands of yarn together
- iCord your yarns before knitting / crocheting (see video below)
- Chain your yarns before knitting / crocheting (see video below)
Are you a Designer or a Maker?
DESIGNERS can pick up a skein of funky handspun and see the project it will create.
MAKERS prefer to let Designers go through the trial and error process of making an item with handspun yarn, and follow the template or pattern they've designed to save themselves the frustration (and the panic) of trial and error.
Both are CREATIVES. They just choose to apply their creativity through different processes. Designers are energized by creating something new, fresh, and different - even if they have to go through the process backwards. Makers are energized by creating something they are confident will turn out pretty because it's already been done and they can follow the method and just create without the stress of designing.
THISyarn's goal is to show MAKERS the possibilities of what to make - and give DESIGNERS a place to share and publish their ideas.